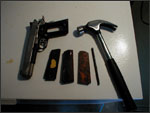
| Pistol
Grips - A ‘How To' Guide
Equipment:
- Jig Saw
- Belt Sander (Coarse & fine belts)
- Drill Press
- Dremel (with cutter attachment)
- Planer (Optional but nice to have!)
- Band Saw (Optional - but nice to have for bigger pieces
of wood)
Tools & Misc:
- Brad point drill bits, 15/64th and 9/32nd
- Transfer punches, 15/64th
- File
- Pencil or Fine tip marker
- Ruler - a good one with 32nds divisions is nice
- 1/4" Chainsaw File
- Old set of pistol grips
- One grip screw
- Government / Officers model size .45 cal pistol (with
grips removed!)
- Hammer
- Small wood block
- Poster putty (or double sided tape)
- Sand paper (150, 220, 400, 600 grit)
- Tung Oil
- Tung Oil Varnish (Optional)
And let's not forget…WOOD! |
|
| To begin, carefully select some good air-dried or low
moisture wood. “SCALES”, which
are pieces of wood pre-cut to the approximate dimensions we
need are what you should look for. You'll need two scales
with dimensions of 4.5” L x 1.5” W x ¼”
H. These dimensions are the absolute MINIMUM
that you can work with if you're really careful. I prefer
5” x 2” x 3/8” so I have a little
room to play with. Our project will be using THUYA, an exotic
burl found only in the deserts of Morocco.
|
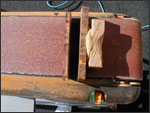
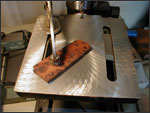
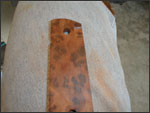
| Next you need to get the grips
down to their proper thickness, which is ¼”.
I do this with a belt sander (coarse belt), and a small wooden
block to hold the scale. I use poster putty to stick the block
to the scale, or you can use double sided tape. The point
here is to get your fingers away from the moving belt, because
it will burn them if you accidentally touch it! Pay careful
attention as you sand down the scale, and stop frequently
to measure each of the four corners of the scale. You want
all corner dimensions (and the whole scale in general) to
be an even ¼” thick when you're done. Figure
4 shows one of the scales sanded down to ¼”.
|
(figure 4) |
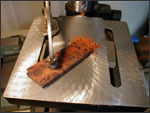
(figure 5) |
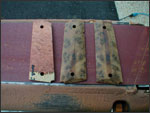
The next step is to use your
transfer punch and mark where the grip screw holes go. (Figure
5) Take one of your old grips (and its matching scale)
and place the old grip on top of the scale. Try to line up
the old grip with the pencil marks on the scale. I use poster
putty here again to keep the grip in place, or you can also
use double sided tape. Take your transfer punch and tap it
with a hammer to make a mark in the scale. Do this for the
other grip screw hole as well. Double check that both transfer
punches are in the center of the grip screw holes of the old
grips. For a full size 1911 grip the center of the holes should
be 3 1/16" apart. If you screw up this step you're going
to do a lot of work for nothing since off-center transfer
punch marks will cause you to drill the holes incorrectly,
and then the whole thing won't fit on the gun when you're
finished…so be very careful on this
step. |
| Place the 15/64th brad point
bit in your drill press. Place one of the scales on the drill
press table and lower the brad bit into the transfer punch
hole. I always drill from the top (presentation side) of the
scale to the back, or frame side. While the brad bit is holding
the scale, clamp the scale down. This centers the brad point
on the scale and you're now ready to drill the first hole.
Figure
6 and Figure
7 illustrate this step. Repeat this step for the other
transfer punch hole. Repeat for the other scale. Don't rush
this step either, because off-center screw holes can ruin
your day. Try to put the grips on the gun - if your holes
are correct it will slide right on. If not, you can take your
chainsaw file and slightly enlarge the hole until they fit.
Keep the 15/64th brad bit in the drill press. Take the first
scale you drilled and flip it over (on its back side). Lower
the brad bit until it goes in the hole you just drilled then
clamp down the scale. Now change to your 9/32nd brad point
bit. Carefully drill down approximately 1 mm (yes, 1 millimeter).
You can use a spare grip screw to check the depth - you want
the head of the grip screw to sit flush in the hole you just
drilled (I put the screw in upside down so just the screw
head goes in the hole while I hold the threads). Place the
15/64th back in the drill press, center it on the other hole,
and clamp it down again. Put the 9/32nd back in, and drill
down again to 1 mm. Repeat this step for the back side of
your other scale. DO NOT drill the screw counter bore on the
front of the grips yet…we'll do that later. |
(figure 6)
(figure 7) |
| At this point you can do a quick check and
put your scales on the gun. The grips should go over the bushings,
but should not go all the way down to the frame yet. If for
some reason you didn't drill the holes right, you'll see it
here. You may be able to save the project by trying to redrill.
If not, get a box labeled “firewood” and chuck
the scales in it. Go back to Step I.
Now go back with your belt sander (fine belt) and “shape”
the scales down to the pencil mark lines. We're not rounding
the grips yet, so only shape the top, bottom, left side, and
right side. Once I have them close to the pencil lines, I
usually hold the scales together so the sander will make both
scales even on every side. Pay careful attention to the top
of the scales and the bottoms. If the tops are not right,
the safety on the gun may not fully depress; if the bottoms
are off, there will be an ugly, uneven angle line between
the grip and the bottom of the magazine well. |
| Now take the left grip (if the
gun is in your hand, it's the grip on the left side of the
gun) and get your Dremel & file. Figure
8 shows the notch that you need to cut (this is why
this grip would not fit down to the frame in Step VII).
Use your
old grip as a guide. I usually “dremel” it down,
then take the file to make the angle smooth & even.
You will know when you're done because the grip will now
fit snugly
and should slide down onto the frame completely.
|
(figure 8) |
(figure 9)
|
If you have an ambidextrous safety,
you will need to cut into the back of your right grip. Using
your old right grip as a guide, mark the right scale where
you need to cut. I use a dremel for this step as well…and
remember you don't need to cut this area too deep. Figure
9 shows this cut. At this point, both grips should fit
snugly down flush on the frame, your safety should be able
to fully depress on both sides, the grips should look “even”
from all angles. |
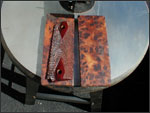
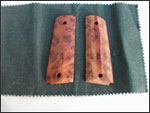
| Now we'll round the grips using
your belt sander (fine belt). Using a rolling motion, shape
and round the grips. Keep in mind that standard grips are
¼” at the screw holes, and can taper down on
both sides to almost nothing. Figure
10 shows an unshaped Amboyna scale on the left, with both
shaped thuya scales on the right. Again, watch your fingers
in this step.
|
(figure 10) |
(figure 11) |
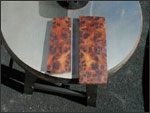
Next take your 150 grit sandpaper
and sand, sand, sand & sand. You'll notice that the belt
sander left some nasty gouge marks…you'll need to make
sure you sand all of those out. Once you've removed the gouge
marks and nicely rounded and smoothed, you can go up to a
finer grit sandpaper and repeat. I usually start with 150,
then go up to 220, then up to 400, and finish at 600 grit.
I've found that I usually spend at least an hour per scale
until they reach the desired smoothness. They should feel
as smooth as glass and have no scratch marks. Figure
11 shows a completely sanded thuya (left) and an unsanded
thuya (right).
|
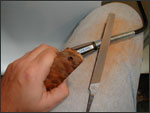
| Now we head back to the drill
press to drill the final front side counter bores for the
grip screws. Using your 15/64th brad bit as a guide, clamp
the grip so that the brad point will be centered. I use an
old piece of scrap wood between the clamp and scale for this
step (remember all that sanding you just did??) to protect
the scale surface. Now change to your 9/32nd bit and drill
a 1 mm deep hole just like we did in Step VI. Change bits
and center the 15/64th on the other hole, clamp, then change
to 9/32nd bit and drill a 1 mm hole again. Remember to use
a grip screw head to check the hole depth so it sits flush.
Repeat for the other scale. (Figure
12) |
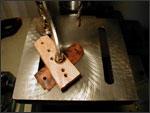
(figure 12) |
(figure 13) |
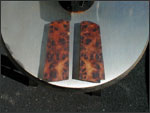
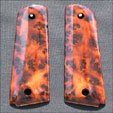
Next step is to apply Tung oil to both grips. There are several
sources of Tung oil, but make sure you get 100% Tung oil.
If Tung oil is not available, you can also try Teak oil, or
boiled Linseed oil. Figure
13 shows the oiled grip (left) vs. the unoiled one (right).
Let the oil dry overnight and repeat. I usually try to put
3 coats of Tung oil all over the grip, letting it completely
dry in between coats. When dry, you can apply a varnish (Tung
oil based) or polyurethane, depending on the finish you like.
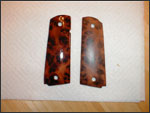
Figure 14 shows the finished grips with 4 layers of tung
oil varnish applied. |
(figure 14) |
| I hope this guide has helped you with your
pistol grip project. If you have any additional tips or tricks
that I've missed please let me know so I can add them here.
Thanks, and best of luck with your grip-making!!
|
|
|